This is a home lab setup to test deployment of Red Hat OpenShift 4.1 on VMware vSphere 6.7 using Intel NUC.
Below is a high level view of the hardware setup.

NUC 1 is my jump-host to access all the other hosts.
Ctrl 1-3 are the OpenShift master nodes, Cmpt 1-3 are the worker nodes and BS-1 is the bootstrap node.
This deployment will be using User Provisioned Infrastructure approach (UPI) on baremetal. All the OpenShift nodes require internet connection to download images. Hence using basecamp to route all the traffic from VM’s to internet.
Virtual Machine resource assignment as below (trying not to burn my NUC’s)
| VM | Operating System | vCPU | RAM | Storage (THIN) |
| Bootstrap | RHCOS | 4 | 8 GB | 120 GB |
| Control plane | RHCOS | 4 | 8 GB | 120 GB |
| Compute | RHCOS | 4 | 4 GB | 120 GB |
IP scheme :
| VM | Hostname | domain | IP address | DHCP/Static |
| basecamp | basecamp | demo.com | 192.168.100.10 | static |
| bs-1 | bootstrap-0 | demo.com | 192.168.100.70 | DHCP |
| ctrl-1 | control-plane-0 | demo.com | 192.168.100.71 | DHCP |
| ctrl-2 | control-plane-1 | demo.com | 192.168.100.72 | DHCP |
| ctrl-3 | control-plane-2 | demo.com | 192.168.100.73 | DHCP |
| cmpt-1 | compute-0 | demo.com | 192.168.100.74 | DHCP |
| cmpt-2 | compute-1 | demo.com | 192.168.100.75 | DHCP |
| cmpt-3 | compute-2 | demo.com | 192.168.100.76 | DHCP |
Download all the required images, installer, client tools and image Pull Secret from : https://cloud.redhat.com/openshift/install/vsphere/user-provisioned
I’m using rhcos-4.1.0-x86_64-metal-bios.raw.gz as all the vm’s created on the esxi nodes are with BIOS.
Now lets prepare the infrastructure:
1> Configure the DHCP on the basecamp to assign IP for all the VM on bootup, I’m also trying to map IP to specific nodes using MAC address.
Below is the config used for DHCP on the basecamp:
# dhcpd.conf
#
# Sample configuration file for ISC dhcpd
#

# option definitions common to all supported networks...
option domain-name "demo.com";
option domain-name-servers basecamp.demo.com;

default-lease-time 600;
max-lease-time 7200;

# Use this to enble / disable dynamic dns updates globally.
#ddns-update-style none;

# If this DHCP server is the official DHCP server for the local
# network, the authoritative directive should be uncommented.
#authoritative;

# Use this to send dhcp log messages to a different log file (you also
# have to hack syslog.conf to complete the redirection).
log-facility local7;

# No service will be given on this subnet, but declaring it helps the
# DHCP server to understand the network topology.

# This is a very basic subnet declaration

subnet 192.168.100.0 netmask 255.255.255.0 {
  range 192.168.100.80 192.168.100.100;
  option routers 192.168.100.10;
  option domain-name-servers 192.168.100.10;
  option domain-name "demo.com";
}

# This declaration allows BOOTP clients to get dynamic addresses,
# which we don't really recommend.

#subnet 10.254.239.32 netmask 255.255.255.224 {
#  range dynamic-bootp 10.254.239.40 10.254.239.60;
#  option broadcast-address 10.254.239.31;
#  option routers rtr-239-32-1.example.org;
#}

# A slightly different configuration for an internal subnet.
#subnet 10.5.5.0 netmask 255.255.255.224 {
#  range 10.5.5.26 10.5.5.30;
#  option domain-name-servers ns1.internal.example.org;
#  option domain-name "internal.example.org";
#  option routers 10.5.5.1;
#  option broadcast-address 10.5.5.31;
#  default-lease-time 600;
#  max-lease-time 7200;
#}

# Hosts which require special configuration options can be listed in
# host statements.   If no address is specified, the address will be
# allocated dynamically (if possible), but the host-specific information
# will still come from the host declaration.

#host passacaglia {
#  hardware ethernet 0:0:c0:5d:bd:95;
#  filename "vmunix.passacaglia";
#  server-name "toccata.fugue.com";
#}

# Fixed IP addresses can also be specified for hosts.   These addresses
# should not also be listed as being available for dynamic assignment.
# Hosts for which fixed IP addresses have been specified can boot using
# BOOTP or DHCP.   Hosts for which no fixed address is specified can only
# be booted with DHCP, unless there is an address range on the subnet
# to which a BOOTP client is connected which has the dynamic-bootp flag
# set.
host bootstrap-0 {
  hardware ethernet <<MAC Address of VM>>;
  fixed-address 192.168.100.70;
  option host-name "bootstrap-0.upi.demo.com";
  option routers 192.168.100.10;
  option domain-name-servers 192.168.100.10;
}

host compute-0 {
  hardware ethernet <<MAC Address of VM>>;
  fixed-address 192.168.100.74;
  option host-name "compute-0.upi.demo.com";
  option routers 192.168.100.10;
  option domain-name-servers 192.168.100.10;
}

host compute-1 {
  hardware ethernet <<MAC Address of VM>>;
  fixed-address 192.168.100.75;
  option host-name "compute-1.upi.demo.com";
  option routers 192.168.100.10;
  option domain-name-servers 192.168.100.10;
}

host compute-2 {
  hardware ethernet <<MAC Address of VM>>;
  fixed-address 192.168.100.76;
  option host-name "compute-2.upi.demo.com";
  option routers 192.168.100.10;
  option domain-name-servers 192.168.100.10;
}

host control-plane-0 {
  hardware ethernet <<MAC Address of VM>>;
  fixed-address 192.168.100.71;
  option host-name "control-plane-0.upi.demo.com";
  option routers 192.168.100.10;
  option domain-name-servers 192.168.100.10;
}

host control-plane-1 {
  hardware ethernet <<MAC Address of VM>>;
  fixed-address 192.168.100.72;
  option host-name "control-plane-1.upi.demo.com";
  option routers 192.168.100.10;
  option domain-name-servers 192.168.100.10;
}

host control-plane-2 {
  hardware ethernet <<MAC Address of VM>>;
  fixed-address 192.168.100.73;
  option host-name "control-plane-2.upi.demo.com";
  option routers 192.168.100.10;
  option domain-name-servers 192.168.100.10;
}
2> DNS configuration
As this is a lab setup, and I dont have a LB, we will use DNS with round robin.
[root@basecamp ~]# cat /etc/named/zones/db.demo.com
$TTL 86400
@       IN      SOA     basecamp.demo.com. root.basecamp.demo.com. (
              3         ; Serial
             604800     ; Refresh
              86400     ; Retry
            2419200     ; Expire
             604800 )   ; Negative Cache TTL
; name servers - NS records
@     IN      NS      basecamp.demo.com.
; name servers - A records
basecamp IN A 192.168.100.10
; 192.168.100.0/16 - A records
vcenter        IN A       192.168.100.60
esxi01         IN A       192.168.100.51
esxi02         IN A       192.168.100.52
esxi03         IN A       192.168.100.53

$ORIGIN apps.upi.demo.com.
* A 192.168.100.74
* A 192.168.100.75
* A 192.168.100.76

$ORIGIN upi.demo.com.
_etcd-server-ssl._tcp SRV 0 10 2380 etcd-0
_etcd-server-ssl._tcp SRV 0 10 2380 etcd-1
_etcd-server-ssl._tcp SRV 0 10 2380 etcd-2
bootstrap-0     A 192.168.100.70
control-plane-0 A 192.168.100.71
control-plane-1 A 192.168.100.72
control-plane-2 A 192.168.100.73
api     IN      A 192.168.100.71
        IN      A 192.168.100.72
        IN      A 192.168.100.73
        IN      A 192.168.100.70
api-int IN      A 192.168.100.71
        IN      A 192.168.100.72
        IN      A 192.168.100.73
        IN      A 192.168.100.70
etcd-0          A 192.168.100.71
etcd-1          A 192.168.100.72
etcd-2          A 192.168.100.73
compute-0       A 192.168.100.74
compute-1       A 192.168.100.75
compute-2       A 192.168.100.76
Below is the iptables setting to create portrouting for the VM to connect to external network (internet)
[root@basecamp tmp]# cat /etc/sysconfig/iptables
*mangle
:PREROUTING ACCEPT [2603:265754]
:INPUT ACCEPT [2594:264998]
:FORWARD ACCEPT [9:756]
:OUTPUT ACCEPT [1676:336014]
:POSTROUTING ACCEPT [1685:336770]
COMMIT
*nat
:PREROUTING ACCEPT [17:2820]
:INPUT ACCEPT [16:2736]
:OUTPUT ACCEPT [3:209]
:POSTROUTING ACCEPT [0:0]
-A POSTROUTING -o wlp58s0 -j MASQUERADE
COMMIT
*filter
:INPUT ACCEPT [2568:262171]
:FORWARD ACCEPT [9:756]
:OUTPUT ACCEPT [1657:326928]
COMMIT
Now, lets prepare the installation configuration file.
create a new directory to store all the install configs and create a new file as below “install-config.yaml”
[root@basecamp tmp]# cat install-config.yaml
apiVersion: v1
baseDomain: demo.com
compute:
- hyperthreading: Enabled
  name: worker
  replicas: 0
controlPlane:
  hyperthreading: Enabled
  name: master
  replicas: 3
metadata:
  name: upi
networking:
  clusterNetworks:
  - cidr: 10.128.0.0/14
    hostPrefix: 23
  networkType: OpenShiftSDN
  serviceNetwork:
  - 172.30.0.0/16
platform:
  none: {}
pullSecret: ‘get the secret from https://cloud.redhat.com/openshift/install/metal/user-provisioned '
sshKey: ’ssh public key to access the OCP nodes with core user’
Create the ignition and Kubeconfig files:
# ./openshift-install create ignition-configs --dir=/tmp/ocp_41/install-dir
This will create the ignition files for bootstrap, master and compute. And also generates kubeconfig and kubeadin-password files in the same location under auth directory
Install web server on the basecamp and move the ignition files to the webserver directory. These files will be fetched by RHCOS when bootstrapping.
All the ignition files and rhcos image is placed in the web server
[root@basecamp ~]# ls -l /var/www/html/
total 1408020
-rw-r--r--. 1 root root    278269 Aug 14 14:50 bootstrap.ign
-rw-r--r--. 1 root root      1817 Aug 14 14:50 master.ign
-rw-r--r--. 1 root root 719954527 Aug  6 13:48 rhcos-4.1.0-x86_64-metal-bios.raw.gz
-rw-r--r--. 1 root root 721567045 Jul 15 10:24 rhcos-4.1.0-x86_64-metal-uefi.raw.gz
lrwxrwxrwx. 1 root root        36 Aug  6 13:49 rhcos.raw.gz -> rhcos-4.1.0-x86_64-metal-bios.raw.gz
-rw-r--r--. 1 root root      1817 Aug 14 14:50 worker.ign
Copy the RHCPS installer ISO to the shared datastore on the esxi nodes
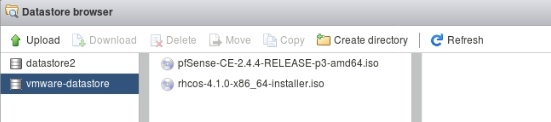
Attach the RHCOS iso to all the VM’s and power on
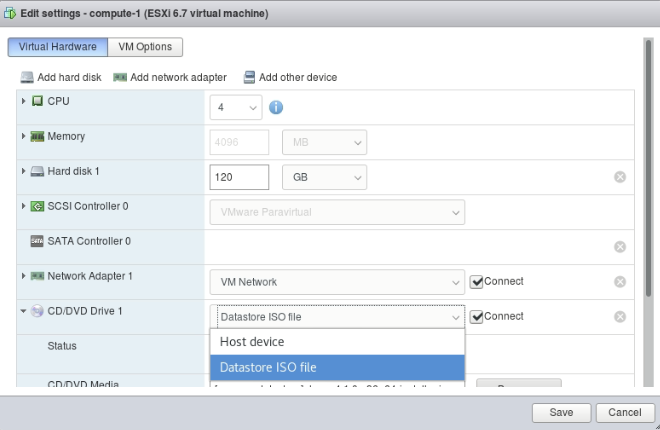
Select the disk, and provide the image URL and Ignition file URL details to start the boot strapping and installation.
Image URL : http://<<IP address of the Webserver>>/rhcos.raw.gz

Ignition file URL :
http://<<IP address of the Webserver>>/bootstrap.ign
http://<<IP address of the Webserver>>/master.ign
http://<<IP address of the webserver>>/worker.ign
Lets wait for the bootstrap VM, you can monitor this using the below command:
[root@basecamp ocp_41]# ./openshift-install --dir=/tmp/ocp_41/install-dir wait-for bootstrap-complete --log-level debug

DEBUG OpenShift Installer v4.1.8-201907241243-dirty
DEBUG Built from commit e8d7e37ea7655522ac8f6ede471fd1d3ebd1bcba
INFO Waiting up to 30m0s for the Kubernetes API at https://api.upi.demo.com:6443...
DEBUG Still waiting for the Kubernetes API: the server could not find the requested resource
DEBUG Still waiting for the Kubernetes API: the server could not find the requested resource
INFO API v1.13.4+4b86cc5 up
INFO Waiting up to 30m0s for bootstrapping to complete...
DEBUG Bootstrap status: complete
INFO It is now safe to remove the bootstrap resources
Now power off the bootstrap VM and remove the entry from the DNS file:
[root@basecamp ~]# cat /etc/named/zones/db.demo.com
$TTL 86400
@       IN      SOA     basecamp.demo.com. root.basecamp.demo.com. (
              3         ; Serial
             604800     ; Refresh
              86400     ; Retry
            2419200     ; Expire
             604800 )   ; Negative Cache TTL
; name servers - NS records
@     IN      NS      basecamp.demo.com.
; name servers - A records
basecamp IN A 192.168.100.10
; 192.168.100.0/16 - A records
vcenter        IN A       192.168.100.60
esxi01         IN A       192.168.100.51
esxi02         IN A       192.168.100.52
esxi03         IN A       192.168.100.53

$ORIGIN apps.upi.demo.com.
* A 192.168.100.74
* A 192.168.100.75
* A 192.168.100.76

$ORIGIN upi.demo.com.
_etcd-server-ssl._tcp SRV 0 10 2380 etcd-0
_etcd-server-ssl._tcp SRV 0 10 2380 etcd-1
_etcd-server-ssl._tcp SRV 0 10 2380 etcd-2
bootstrap-0     A 192.168.100.70
control-plane-0 A 192.168.100.71
control-plane-1 A 192.168.100.72
control-plane-2 A 192.168.100.73
api     IN      A 192.168.100.71
        IN      A 192.168.100.72
        IN      A 192.168.100.73
api-int IN      A 192.168.100.71
        IN      A 192.168.100.72
        IN      A 192.168.100.73
etcd-0          A 192.168.100.71
etcd-1          A 192.168.100.72
etcd-2          A 192.168.100.73
compute-0       A 192.168.100.74
compute-1       A 192.168.100.75
compute-2       A 192.168.100.76
From the downloaded client tools (openshift-client-linux-4.1.11.tar.gz), extract the oc utility.
[root@basecamp ocp_41]# tar -xvf openshift-client-linux-4.1.11.tar.gz
 README.md
 oc
 kubectl
 [root@basecamp ocp_41]# ls
 kubectl  oc  openshift-client-linux-4.1.11.tar.gz  README.md
export KUBECONFIG=<installation_directory>/auth/kubeconfig
Use oc command and the auth file to check the nodes

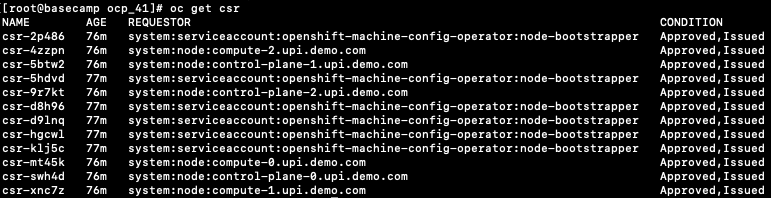
Check for any pending CSR on the nodes and approve is any pending
Now lets configure the storage for image repository
As this is a lab setup setting the image registry to empty directory
#oc patch configs.imageregistry.operator.openshift.io cluster --type merge --patch '{"spec":{"storage":{"emptyDir":{}}}}'
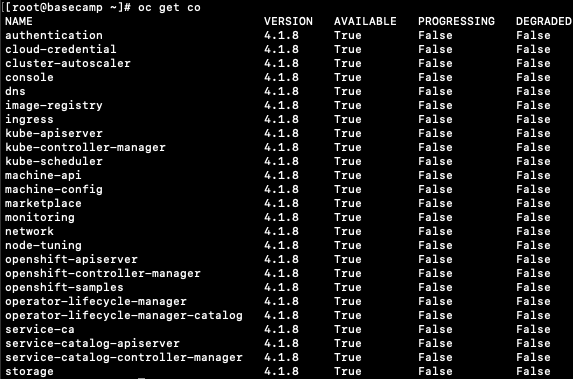
Before finishing the installation, check if all the cluster operators are online.
Check for the cluster installation completion using the below command
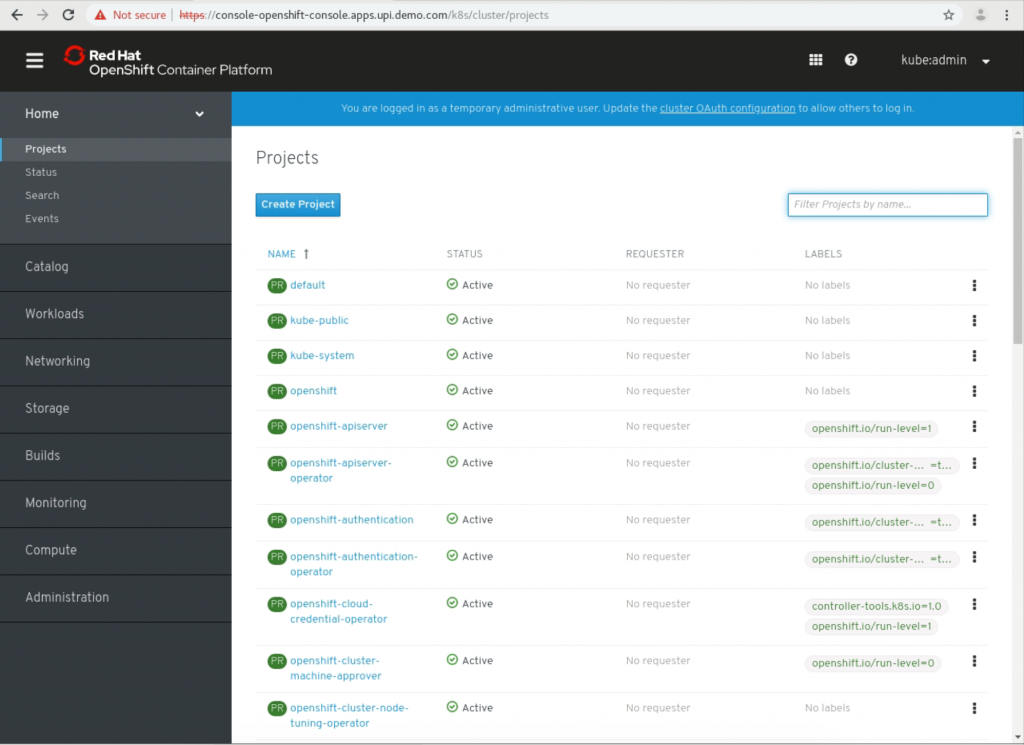
[root@basecamp ocp_41]# ./openshift-install --dir=/tmp/ocp_41/install-dir wait-for install-complete

INFO Waiting up to 30m0s for the cluster at https://api.upi.demo.com:6443 to initialize...
INFO Waiting up to 10m0s for the openshift-console route to be created...
INFO Install complete!
INFO To access the cluster as the system:admin user when using 'oc', run 'export KUBECONFIG=/tmp/ocp_41/install-dir/auth/kubeconfig'
INFO Access the OpenShift web-console here: https://console-openshift-console.apps.upi.demo.com
INFO Login to the console with user: kubeadmin, password: XXXXX-XXXXX-XXXXX-XXXXX
Now try to login to the console using the above mentioned user and password